You have reached the support section of Enfocus.com. This content is only available in English.
New features and functionality
Remote Designer
From this version onwards, you are no longer obliged to use the Switch Designer on your Switch Server. Now that we implemented the Remote Designer, you have the possibility to administer your Switch Server wherever you want. You can use only one Designer at the time (local or remote), but you can install it as often as you like, on a MAC and a PC.
How to set up Remote Designer
- Install Switch on all systems that will be used to work with Switch (both the Switch Server that will be used to run the processes + all systems you would like to use as a Remote Designer).
Note: For installing the Switch Remote Designer, you use the same installer as for a regular Switch installation. - Activate Switch on the system that will run the processes. The Remote Designer gets the license automatically from the Switch Server.
- Configure the users and/or user groups that will have the right to use Remote Designer. The first time you will have to do this on a local Switch Designer (system on which you have activated Switch).
- Exit the Designer and make sure that the Switch Server is still running to be able to connect to a Remote Designer or start the Watchdog from your Switch application directory.
Note: You can only connect to one Remote Designer /Designer at the same time.
How to launch Switch remotely, i.e. using Remote Designer
- On any PC or Mac on which you installed Switch, start Switch.
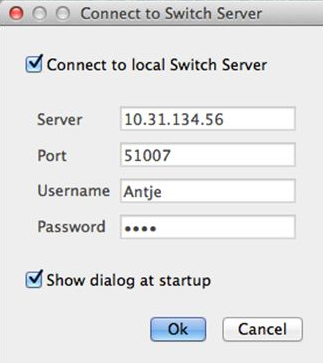
The following dialog pops up:
- Do one of the following
- To connect to the Switch Server installed on your local computer, select the Connect to local Switch Server checkbox.
- To connect remotely, i.e. to connect to a Switch Server installed on another computer, enter the required details:
- IP address or host name of the computer on which you have installed Switch Server
- Port number
- User name and password
Note: This depends on the setup in the Users pane.
- To hide this dialog next time when you start Switch, clear the Show dialog at startupcheckbox.
Note: If you hide this dialog, the selected connection (local or remote connection to a particular computer) is considered the default connection. You can afterwards still change the connection from within Switch, by selecting File > Connect to Switch Server. - Click OK.
- The licenses on the Switch Server are checked in the background. If the licenses are valid, Switch Designer is opened. In the title bar of the Switch Designer, you can see the IP address of the computer you are connected to.
Note: Remember that your access rights depend on the settings in the Users pane. Users having read-only access, will not be able to edit flows or to change settings.
New Users pane
In earlier versions of Switch, the Users pane was only used to set up access rights for users accessing Checkpoints or Submit points in Switch Server for SwitchClient. Hence, it was only available if you activated the SwitchClient module.
From this version onwards, the Users pane is always available and has an extra functionality: it allows you to set up the user rights for Switch Remote Designer.
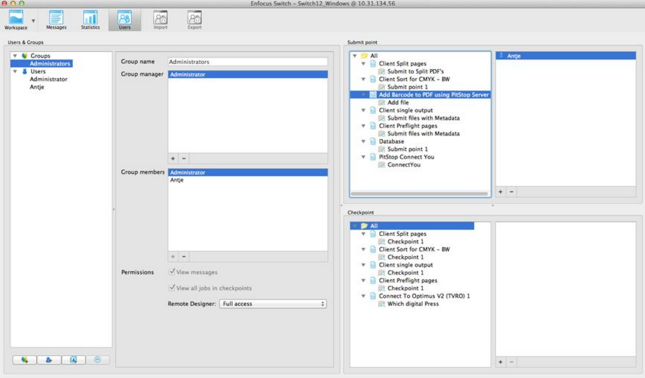
Redesigned Users pane
The Users pane has been fully redesigned. It is now easier to configure users and user groups and to assign them the permissions they need.
In the left part of the pane, you can configure users and user groups, and assign them permissions for SwitchClient and Remote Designer.
In the right part of the pane, you can grant users and user groups access to particular Submit points and Checkpoints.

About users and user groups
In the previous version, there were a number of predefined user roles linked to certain permissions/access rights. From Switch 12 onwards, “roles” are no longer used.
You are now free to configure your users and user groups, and assign them the permissions they need.
Remark:
When upgrading from an earlier version, all users (including users with an “Operator role”) will be converted to regular users. You will have to reconfigure their access rights.
How to configure users and user groups
Proceed as follows:
- Create a user.
- Add this user to a group if necessary.
Note: Configure user groups if several users should have the same access rights. - Define a Group manager if necessary.
Note: Group managers have more rights than the other group members (see further).
If you want to use SwitchClient:
- Assign the appropriate permissions for SwitchClient:
- To allow the users (or members of the user group) to view error messages, select the View messages checkbox.
Note: Regular group members will only be able to see their own messages, whereas Group managers will see all messages of all group members. - To allow the users (or members of the user group) to view all jobs arriving in all Checkpoints they have access to, select View all jobs in checkpoints checkbox.
Note: If this checkbox is cleared (default), users can only see their own jobs or, if they are a Group manager, the jobs of the group they belong to.
- To allow the users (or members of the user group) to view error messages, select the View messages checkbox.
If you want to use Switch Remote Designer:
Configure access rights for Switch Remote Designer:
Depending on what the user is allowed to do with Remote Designer, select:
- No access
- Read only access
- Full access
How to configure access rights for SwitchClient Submit points and Checkpoints
For each Submit point/Checkpoint used in your Switch flows, you must define which users/user groups have the right to access it.
Proceed as follows:
- Select the Submit point or Checkpoint the user or user group should have access to.
Note: All flow groups of the Designer are shown in the right part of the Users pane. - Click the + button and select the appropriate user or user group.
What can users do in the Submit points or Checkpoints they have access to?
This depends on:
- The group they belong to (if applicable), and the permissions assigned to this group.
- Note that there is a built-in group “Administrators”.
This group cannot be deleted and the members of this group can do anything: unlock files, process any jobs and view all messages…
- Note that there is a built-in group “Administrators”.
Only Administrators can unlock jobs.
- Their permissions on user/user group level (View messages/View all jobs in Checkpoints checkbox – see earlier in this document).
- Their role in the group (Group manager or regular group member):
- A Group manager can only submit jobs in a Submit point if he or his group was added to the Submit point, i.e. it is not enough that one member of his group was added!
- Users who are added to a Checkpoint can see, edit and route their own jobs. If the added user is a Group manager, he will also be able to view, edit and route jobs coming from other members of that group.
- When adding a group to a Checkpoint, all members of that group can see, edit and route their own jobs, while only the Group managers can see, edit and route all jobs coming from that group.
Support for Active Directory
From this version onwards, you can assign access rights based on your existing Active Directory users and user groups. In that case, you don’t need to create new users or groups in Switch, you can easily import them from your Active Directory.
How to set up Active Directory in Switch
1. Open the User preferences dialog in Switch
- On Windows, select Edit > Preferences.
- On Mac, select Enfocus Switch > Preferences.
2. Select Active Directory settings.
3. Enter the address of your AD (Active Directory) server, and the user name and password to log on to your AD server.
How to import users and user groups from your Active Directory:
- In the Users pane, click the Select AD user or group button.
- In the dialog that pops up, enter (part of) the Active Directory (user) name or email address.
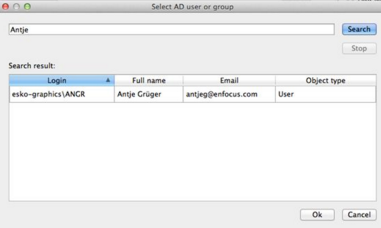
- Click Search and select the user or user group you want to use in Switch.
- Click OK.
If you selected an AD group, the group name and the group members are displayed in the Groups category in the Switch Users pane.
If you selected an AD user, the user name, full name and email address are displayed in the Users category in the Switch Users pane. Note that these details are read-only.
5. Configure the permissions for SwitchClient and Remote Designer if necessary. This is done in the same way as for other Switch users and user groups.
Changed behavior
With the introduction of the Remote Designer, we changed the default behavior of the preference “Start Switch Server automatically at login” to “YES”. Note that the preference “When exiting the flow designer” is only taken into account when “Start Switch Server automatically at login” is “No”.
We added a menu item to be able to stop the Switch server completely e.g. for maintenance reasons. This applies only to Local Designer.
Reduced number of Messages
In earlier versions of Switch, we stored enormous amounts of messages in the message database. The amount of messages was so big, that complex installations could have problems with the large number of messages and it could happen that Switch slowed down or even crashed. Therefore we changed the message handling.
Switch now stores only messages about the Server that are independent of individual jobs or elements. Switch stores as well all error and warning messages about jobs and elements.
When logging to text files is enabled, all messages (including job/element related messages) are stored in the text files.
“Logging ftp interaction” will still be done in separate files.
When enabling debug logging, assert messages are also stored in the Switch message database. All other debug logs are only written to text files.
When exporting to xml logs, only messages stored in the message database are exported.
When logging to text files is enabled, we create a new file every 10000 messages and every day. The file name of the text files contains the date in form YYYYMMDDHHmmss to make it easy to search for logs of a certain time. The cleanup log messages preference will also clean up the text files older than x number of days depending on this preference.
Note: As a scripter you still have access to all messages to be able to debug your script.
Upgraded Tools
Split PDF and Merge PDF now support concurrent instances.
New Configurators
- HP SmartStream Production Center JDF Control
- Corel Draw
Upgraded Configurators
- Support for Adobe CC
- Quark Xpress Configurator
- Bug fixes
- Now supports PDF creation
Support for new Operating Systems
- Windows 8.1
- Mac OS® X 10.9 (Mavericks)
Bug Fixes
Those are the most important bugs fixed:
|
Number
|
Description |
|
27463 |
In some cases Switch Service crashes when updating XMP info. |
|
28155 |
Files are cut off at 1 GB when Switch sends them via FTP to certain FTP servers. |
|
28677 |
Memory corruption after licensing issues. |
|
28887 |
Rename is not working when there is a + in the file name. |
|
29050 |
Designer crashes on flow update when multiple flows are selected. |
|
29257 |
Server crash after unsuccessfully stopping a script process. |
|
29620 |
Switch Server on Windows doesn't clean up subfolders if they only contain hidden Mac system files. |
|
29746 |
Crash when using finalize Processing function in combination with certain external scripts. |
|
29624 |
The Inject job tool creates a new job ticket every 30 seconds when not set up to do so. |
|
29924 |
The Job.FailMessage variable is not filled in when a job is moved to the Problem jobs folder, because Switch terminated the script. |
|
30114 |
Service is closed by the Watchdog when a crash happens in PitStop Server. |
|
30194 |
Switch is not able to restart after it started an external process . |
|
30323 |
Can't connect to a certain SFTP server . |
|
30456 |
Random Server crash on communication with SwitchClient |
|
30461 |
Random Server crashes when multiple clients connect to the same server. |


