You have reached the support section of Enfocus.com. This content is only available in English.
Table of contents
- New features and functionality
- Integration with the Monotype Baseline™ platform
- Image adjustment via manipulation of color curves in the Inspector
- Image adjustment via Brightness / Contrast in the Inspector
- Image sharpening via Unsharp Masking in the Inspector
- Edit shadings tool
- Group / Ungroup
- Align and distribute
- Color mapping options now available in the Actions dropdown
- Global changes
- New Actions
- New Preflight Check
- New Action lists
- Language support
- Removed functionality
- Bugfixes
New features and functionality
Integration with the Monotype Baseline™ platform
Enfocus has entered into a co-operation with Monotype to provide a solution for PDF files with missing fonts.
The solution can be used when the user has a PDF file that has a missing font, but does not have the required missing font available locally to embed.
When correctly configured, PitStop Pro can connect with the Monotype Baseline platform to find out if any required missing fonts are available online, and if so can download those fonts and embed a subset of them into the PDF to enable it to be printed successfully.
The user is charged a nominal fee per embedded font, on a per document basis.
Within PitStop Pro all font purchases require a manual ‘Buy’ or ‘Don’t Buy’ decision.
Fonts are never purchased automatically in PitStop Pro.
It is important to understand that you are not buying the font and you do not own it. What you are buying is the right to embed a “subset” of the font for the PDF document that is being processed to replace any missing fonts. The purchased fonts are not available on the local computer and cannot be used by other applications.
To use the system the user first has to create an account on the Monotype Baseline platform. Once the account is created the user is able to generate a security token that must be added to the font preferences of PitStop Pro in order to connect to the Monotype cloud font server.
There are two ways to configure the system within PitStop Pro.
1. Within the PitStop Pro font preferences turn on ‘Automatically check Monotype Baseline service for missing fonts’. Turning this option on means that PitStop Pro will automatically check the Monotype Baseline platform anytime a Preflight Profile, Action List, Quickrun or Global Change is used that includes a fix for embedding missing fonts. If fonts are not available locally, but are available from the Monotype service, the user will be shown an interface (see below) enabling them to decide whether to purchase the fonts or not.
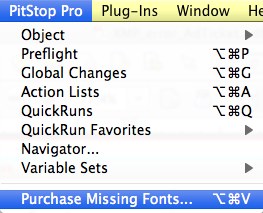
2. Leave this option turned off so it does not happen all the time, and if you ever want to see if any missing fonts are available, simply use the menu item ‘Purchase Missing Fonts’. This will query the Monotype service to see if any of the missing fonts are available.
Once the font query is finished, you will be shown a new interface (screenshot on following page) that will show the fonts that are available to buy, fonts that are available locally, and any fonts that are not available locally or online and are still missing.
In order to help you make an informed decision about purchasing fonts, you are also shown a preview of the document with the available fonts embedded. This preview can be zoomed and panned. It is also possible to navigate through the pages in a multi-page PDF document.
Also, by clicking on a font in the panel on the left hand side of the interface, the user can jump to the location of the font, so navigation is very simple and straightforward.
The amount of credits the purchase of online fonts will cost is also clearly displayed.

You will also be given the option to buy or not buy the fonts. If you select ‘Buy and Save’ the fonts will be purchased, embedded, and the document automatically saved. If you choose ‘Don’t Buy’, the purchase will be cancelled and the document returned to its original state although any locally available missing fonts will still be embedded automatically.
Image adjustment via manipulation of color curves in the Inspector
This new functionality enables you to edit the color curve of any image within a PDF. It works on all possible colorspaces and image types and allows you to edit the entire image or individual separations. You can add or remove points on the image curve and also manipulate points via the mouse or by entering numbers for the input/output values.
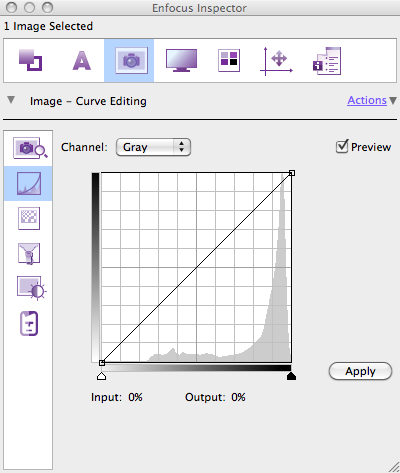
Curve Editing works on selected images and can also work on multiple images simultaneously as long as they have the same colorspace. A preview option is available allowing the user to see the adjustment before ‘applying’ it to the image.
Image adjustment via Brightness/Contrast in the Inspector
Individual or multiple selected images can now be adjusted using Brightness/Contrast functionality in the Inspector.
Image sharpening via ‘Unsharp Masking’ in the Inspector
Images can now be sharpened directly within a PDF file. The functionality, as with all our new image options, can be used on individual images or on multiple selected images simultaneously.
Shading (blends/gradient) editing in the Inspector
You will notice that the fill and stroke panels of the Inspector now looking slightly different: this panel now has support for working with shadings.
When a shading is selected, the shading is visualized in the Inspector along with any control points that have been detected in the blend. These control points can be moved and the tint values of the separations in the control point can be edited.
Control points can also be added and deleted.
Edit Shadings tool
In addition to manipulating shadings in the Inspector, we also have a dedicated ‘Edit Shadings’ tool that can be enabled. This works in conjunction with the Inspector and allows you to make adjustments to the PDF file directly in the PDF. The tool can be enabled from the Edit tools panel (see below).
Creating a new shading
Shadings can also be created, in fact a shading works in a similar way to a fill and stroke and can be applied to selected text or line art objects.
Group/Ungroup
Available in the right click menu or via icon tools in the Editing tools panel, these functions allow multiple objects to be grouped. A grouped set of objects can be cut and pasted or edited and as if it were a single object.
If you cut and paste grouped objects between pages or different documents the grouping remains, making this a very powerful editing tool.
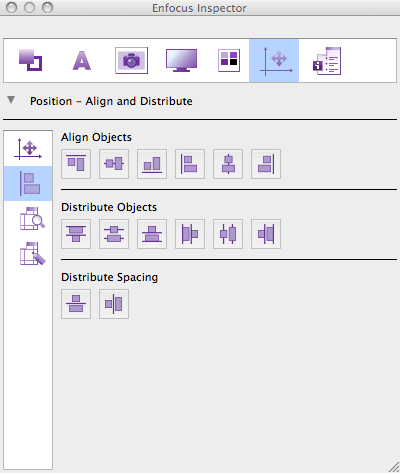
Align and distribute
New in PitStop 12 are a set of alignment and distribution tools. These can be applied to multiple selected objects and can be accessed from the Inspector (screenshot below) or via the right click menu.
Color Mapping options now available in the Actions dropdown
The color conversion options that are available in the Fill/Stroke tab and also the Image Editing tab have been extended; these all now contain options for color mapping of objects.
The difference between mapping and converting is that when you convert to a different color or colorspace you are using the ICC color management to do the conversion, therefore your color management settings play a major part in the result you will get.
This may result in unexpected effects, for instance an original solid 100% may after conversion be a lower tint weight.
With mapping, the color management is turned off, so the conversion is a straight map from one colorspace to the next.
Global Changes
Clean up Black Global Change now works on RGB Black Images
The Clean up Black global change has been extended to work with Black RGB Images. Any RGB image that has equal values of R, G and B, +/- 1% is now deemed to be an RGB Black image and is converted to a Black only image in CMYK. Previously such images would have been converted to a 4-color build.
New Actions
Image - Brightness/Contrast
This action duplicates the functionality available in the Inspector but as an action, so it can be included in Action Lists and used in PitStop Pro and PitStop Server.
Image - Unsharp masking
This action duplicates the functionality available in the Inspector but as an action, so it can be included in Action Lists and used in PitStop Pro and PitStop Server.
Image – Gaussian Blur
This action is not available in the Inspector, it’s currently only available as an action.
This action applies a Gaussian blur to selected images and allows the user to define the radius of the blur.
Remove empty layers
Another new action for working with PDF Layers or Optional Content Groups (OCG’s, to give them their technical name). This removes any empty layers from within a PDF file and can be used in conjunction with other actions to select and remove content from layers.
Check font size by lowercase x-height
A new European Union regulation, EU Regulation No. 1169/2011, which goes into effect on December 13th 2014, specifies minimum font size requirements for the nutrition declaration on food packaging. This requirement is based on the lowercase x-height of the font as it is designed to guarantee legibility.
This new action allows type size to be checked in this way.
Please note that if type is subset, there must be a suitable character available (x, u, v, w or z) for the check to work, otherwise the check will fail.
http://en.wikipedia.org/wiki/X-height
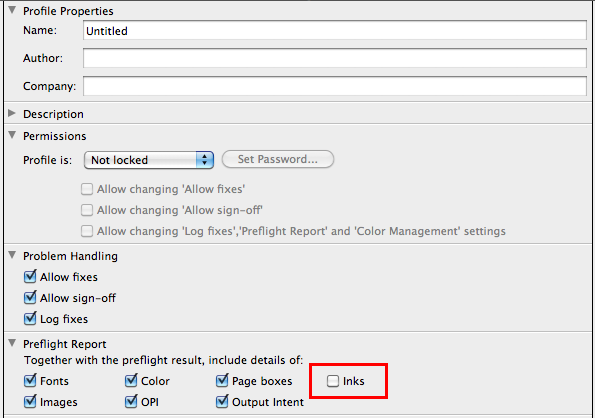
Gather ink usage
This action calculates the amount of each color separation needed to print a page, and a complete document, i.e. how much of each page is actually covered by each ink.
This action reports the result in % of the page size and also as inch², cm² or mm² depending on your unit preferences.
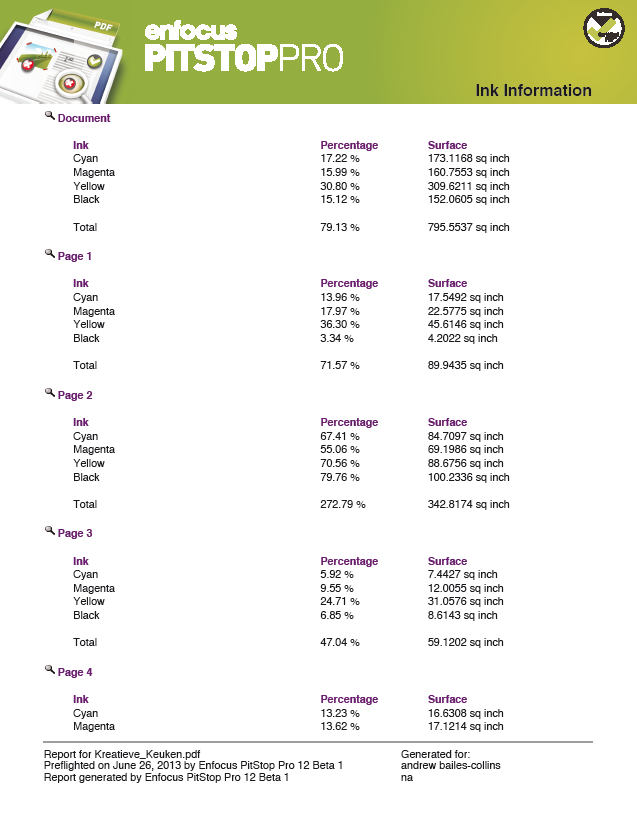
The ink usage report is also included as part of the Preflight Profile editor, so it can be generated within a preflight report by checking the check box highlighted below.
This report is off by default.
Checking of object level metadata
As part of the preflight checks for PDF/X-4, this improved check analyzes object level metadata and ensures that it is ‘well formed’.
Check, fix and removal of ‘badly formed’ object level metadata
‘Well formed’ object level metadata is a requirement for PDF/X-4 and also for the Ghent Workgroup 2012 specifications as they are based on PDF/X-4. However, if a user simply requires a PDF file for printing then metadata may not be that important. There is a new action that checks that XMP metadata is well formed, and a second new action that attempts to fix this issue. The fix action also has an option to remove the badly formed metadata if it cannot be fixed, ensuring that PDF files can be made PDF/X-4 compliant.
Remove PDF/A key and Remove PDF/X key
These two new actions do exactly what they say, they remove the stated PDF keys.
Flatten layers to current view
This is a new option in the existing action ‘Flatten Layers’. This new option allows layers to be flattened to the current state of the PDF rather than just the default view that was available previously.
Flatten Form Fields to printable Content
This new action converts form fields to normal objects within a document. This new fix will be very useful for companies who have output issues with content as form fields.
New Preflight Check
Check for white overprinting objects
Similar in operation to the existing check for overprinting white text, this check looks for white line art objects that overprint. There is also a fix available within the Preflight Profile to make them knockout.
New Action Lists
- Add +10 Brightness to Images
- Add +10 Contrast to Images
- Add +50 Gaussian Blur to Images
- Add Varnish Separations to PDF layers (OCG’s)
- Isolate Colorspaces
- Isolate Images, Text, Graphics and Shadings
- Report all Non-Black Objects
- Sharpen Images using USM – Standard
- Sharpen Images using USM – Strong
Language Support
PitStop Pro 12 is now available in Brazilian Portuguese
Removed Functionality
Scitex PDF2Go™ is no longer supported
PDF2Go™ is a raster based format from Scitex that was used in the 1990s’ as a way of outputting a ripped and trapped PDF file from a Brisque workflow. It was based on the CT/LW format. Because of technical changes to PitStop to support new functionality, we removed support for this old style of PDF.
Bug fixes
|
Log Number |
Description |
|
21029 |
list of the characterization data in PDF/X is not in the correct order |
|
14969 |
Cannot generate output objects |
|
10906 |
critical failure |
|
19212 |
No error when we were not able to create the annotated report |
|
11022 |
file size increases from 3 MB to 120 MB |
|
18791 |
Mac installer fails with "Cannot link Acrobat bundle" |
|
12554 |
Flattening causes Quarantine and crash |
|
14947 |
Remove PDF/X tag |
|
25787 |
Select outside region doesn't select clipped away objects. |
|
26703 |
Part of image missing because of wrong image mask path |
|
26725 |
Check Save Type Zone doesn't check objects in a clipping mask |
|
26750 |
Remove PDF/A version key |
|
26960 |
Crash when trying to change fonts using a specific font |
|
26967 |
Tools lose information with certain combination of PitStop panels |
|
27837 |
Action List can select form but remove is not working |
|
27873 |
Missing values message in Navigator |
|
27878 |
Critical parser failure: Properties are missing |
|
28065 |
Acrobat cannot close when having ip set in the PitStop Pro preferences |
|
28115 |
Processed file makes rip fail |
|
28119 |
Crash when trying to normalize page rotation key |
|
28158 |
Objects that are completely clipped away not recognized |
|
28362 |
Acrobat crashes when opening a CertifiedPDF file if Javascript is disabled |
|
28365 |
Action List Apply Devicelink is not saving the settings |
|
28373 |
Tiling pattern that gets changed when it shouldn't |
|
28453 |
Acrobat crashes when remapping the process channels to a white separation. |
|
28525 |
UI bug in Apply Device Link action |
|
28572 |
Crash when removing text objects using the edit text line tool |
|
28584 |
Show RGB in percentage or not |
|
28609 |
Remap Color EAL UI problem |
|
28673 |
Cannot resize component column in eyedropper |
|
28725 |
Change objects to close to page edge: treat sub path of compounds paths individually doesn't seem to work |
|
28865 |
Objects inside forms are moved multiple times when moving via a specific Action List |
|
28876 |
Always use ZIP compression on objects with a color key mask. |
|
28934 |
Blue object becomes orange after flattening |
|
29062 |
Wrong result after transparency flattening |
|
29108 |
Custom report template definitions encoded in ANSI and UTF-8 are not working |
|
29192 |
Crash, create a new color in the color picker |
|
29209 |
Edit page boxes in Inspector doesn't honor the page rotation key |
|
29218 |
Layer check not working if ink coverage is set to 'basic objects' |
|
29327 |
Inspector shows Lab values in % |
|
29458 |
RGB transparency groups are not checked when checking for RGB objects |
|
29568 |
Loading the color picker in the Inspector or Global Change is leading to crash, when color libraries are put in the PitStop Pro resources |
|
29591 |
The dropdown is displayed empty for the Action List Select size of object |
|
29666 |
Add tooltips to the different folders path when these are not completely visible |
|
29727 |
The fix for different page sizes found is executed when there is only one page in the document. |
|
29728 |
Color Remap -> Channel --> Pick spot color does not work |


